Trip Highlight
Cities
- Puerto Natales, Chile
- El Calafate, Argentina
- Santiago, Chile
National Parks
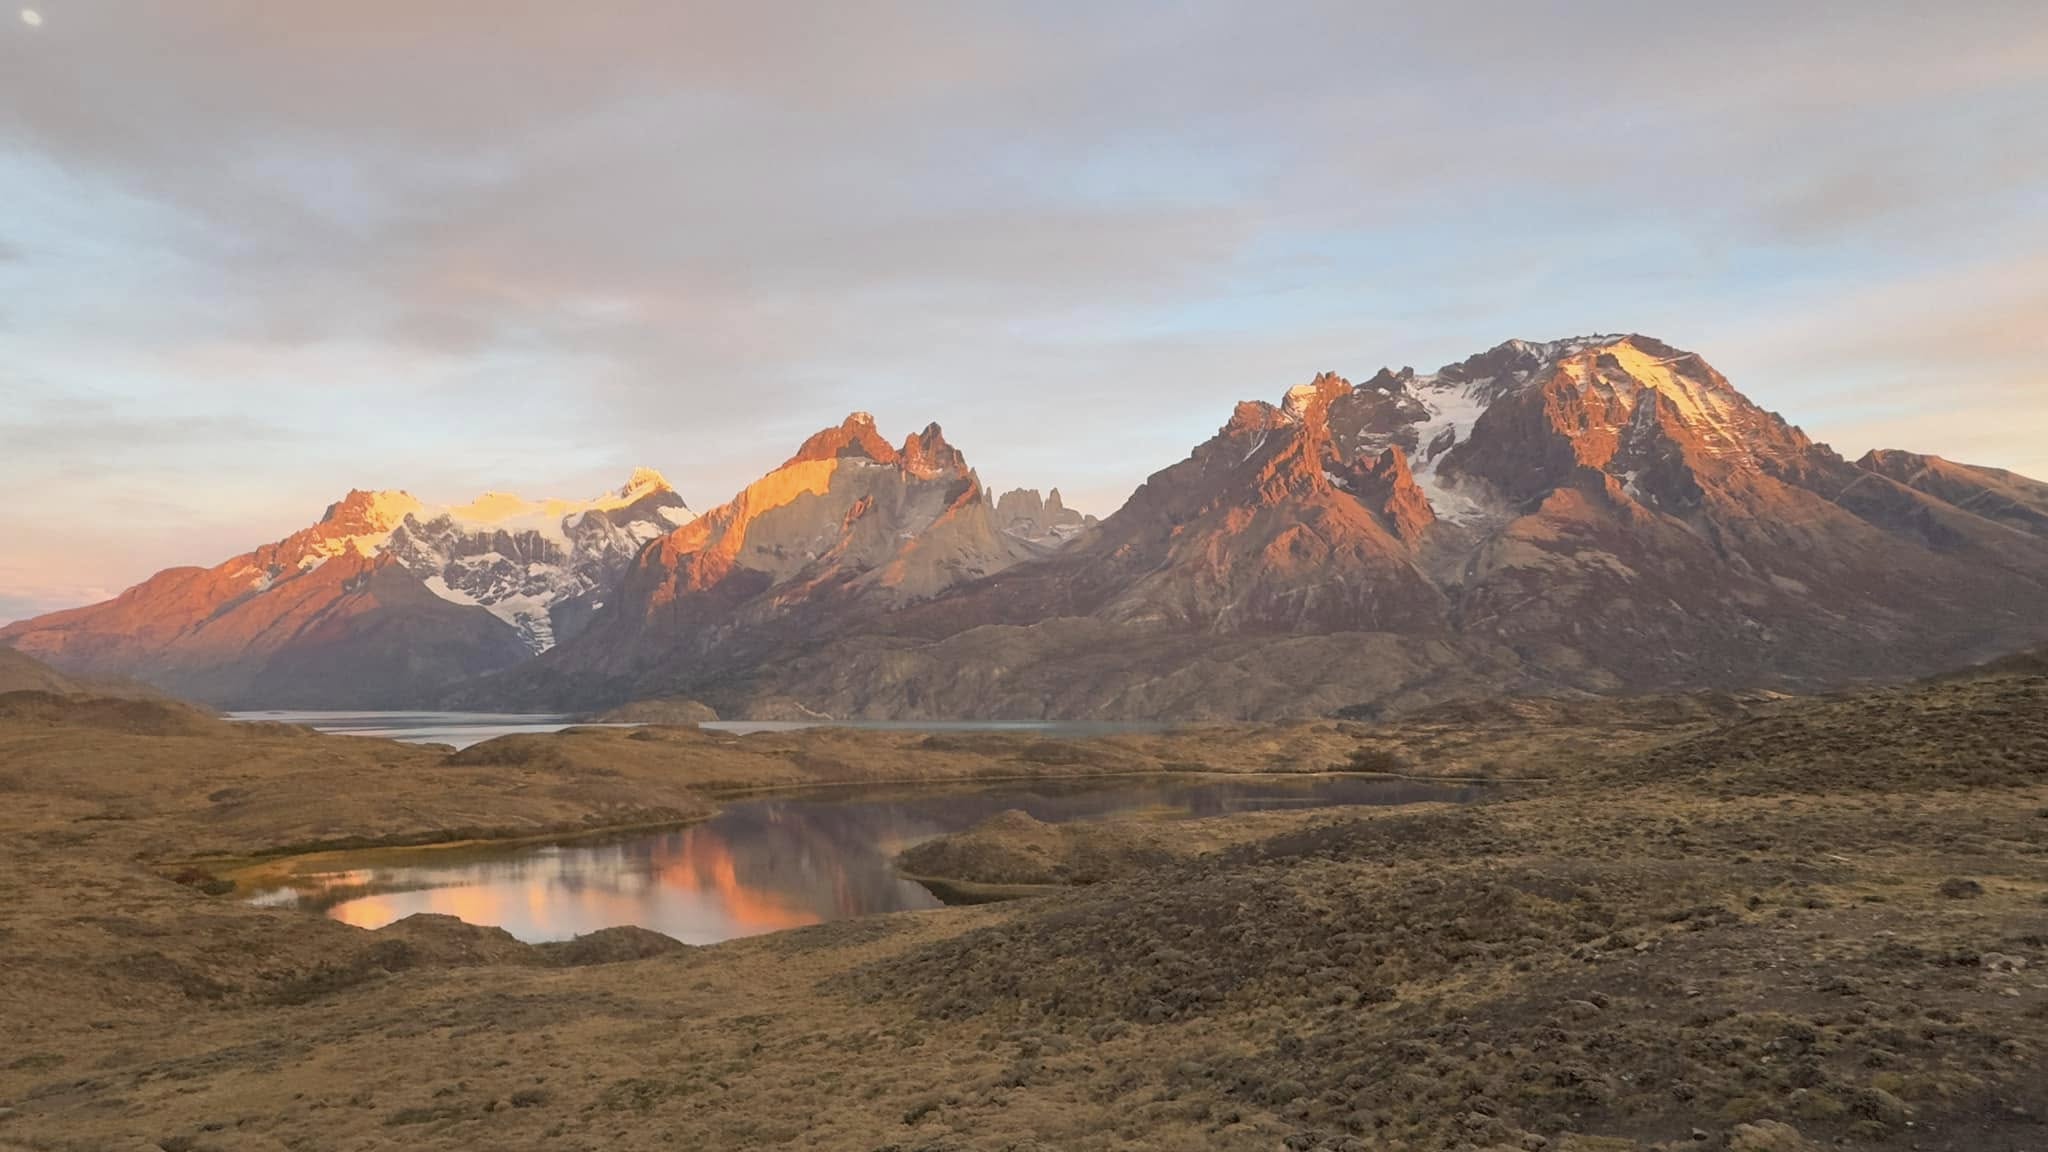
- Torres del Paine National Park, Chile
- Los Glaciares National Park (Perito Moreno Glacier), Argentina
- Bernardo O’Higgins National Park (Balmaceda & Serrano Glaciers), Chile: Bernardo O’Higgins National Park Information
Useful Information
Torres Del Paine National Park
Dreaming of conquering the iconic W Trek in Torres del Paine? It’s an unforgettable experience, but proper planning is key to a smooth and enjoyable adventure. Here are some short, crucial tips to get you started:
Whether you’re tackling the W Trek or just exploring the highlights, Torres del Paine National Park is an absolute must-see. To make your visit as smooth and awe-inspiring as possible, here are some key tips:
- Book Everything in Advance (Seriously!): This cannot be stressed enough. Accommodations (refugios, hotels, campsites), W Trek bookings, bus transfers, and even the catamaran to Paine Grande sell out months in advance, especially for the high season (October-April). If you don’t have reservations, you may be denied entry to certain parts of the park or even the park itself.
- Understand Park Entrances & Your Route: Familiarize yourself with the main entrances (e.g., Laguna Amarga for Las Torres, Pudeto for Paine Grande ferry, Serrano for buses/private vehicles from Puerto Natales). Knowing your starting point and intended route will help you plan transport efficiently.
- Embrace All Seasons in One Day: Patagonian weather is famously unpredictable. Pack layers! A waterproof and windproof outer shell is crucial, along with warm mid-layers and quick-drying base layers. Be prepared for sun, rain, strong winds, and even snow, all within a few hours.
- Fuel Up and Stay Hydrated: While some refugios offer food, it’s expensive. Carry enough snacks and water for your daily adventures. You can refill water bottles directly from many streams (the water is usually potable and incredibly fresh).
- Rent a Car for Flexibility (If Not Doing the W Trek): If you’re planning day trips and not solely relying on park buses for the W Trek, renting a car in Puerto Natales offers incredible flexibility to explore viewpoints like Salto Grande, Mirador Nordenskjöld, and Laguna Azul at your own pace. Rental car is not required if doing the W Trek.
- Be Prepared for the Wind: The Patagonian wind is legendary. It can be incredibly strong, making hiking challenging and even affecting your balance. A good windbreaker, trekking poles, and a hat with a chin strap are highly recommended.
- Respect Wildlife and Nature (Leave No Trace): This is a pristine wilderness. Stay on marked trails to protect the fragile ecosystem. Do not feed or approach wildlife. Pack out everything you pack in, including all trash. Camp only in designated areas.
- Enjoy the Disconnect: Cell service and Wi-Fi are limited or non-existent in much of the park. Embrace the opportunity to unplug and fully immerse yourself in the natural beauty surrounding you.
W trek
- Book Accommodations MONTHS in Advance: This is arguably the most critical tip. Refugios (lodges) and campsites along the W Trek, especially during peak season (November-March), sell out incredibly fast. Aim to book 6+ months out, or even earlier for popular spots like Paine Grande and Chileno. No bookings, no trek. Since we were going in shoulder season (April) and we booked last minute, we were not able to book Accommodations for the full W trek and opted to only do parts of the W trek instead of the full trek.
- Pack Light, But Smart: Every ounce counts on the trail. Invest in lightweight, multi-functional gear. Layers are essential for Patagonia’s notoriously unpredictable weather – expect sun, wind, rain, and even snow, all in one day! Don’t forget sturdy, broken-in hiking boots.
- Understand Your Food Options: You can carry all your own food (lighter on the wallet, heavier on the back), buy meals at refugios (convenient, but pricey, and requires booking), or a combination. Plan your resupply points carefully if you’re cooking for yourself.
- Know the Ferry and Bus Schedules: The catamaran across Lago Pehoe and the bus connections are vital for getting around the park. Check their schedules and book ferry tickets in advance, especially the Paine Grande crossing, as they can sell out.
- Embrace the Weather: Patagonia’s weather is famously fickle. Be prepared for anything and everything. Don’t let a little rain or wind dampen your spirits; often, it just adds to the dramatic atmosphere.
- Leave No Trace: Torres del Paine is a pristine wilderness. Pack out everything you pack in, stay on marked trails, and respect wildlife. Help preserve this incredible national park for future adventurers.
Accommodation
Torres del Paine National Park offers a range of accommodation options, from luxurious hotels to basic campsites, catering to different budgets and styles of travel. However, the most important rule for any accommodation inside Torres del Paine is: BOOK MONTHS IN ADVANCE! Especially during the peak season (November to March), spots sell out incredibly fast.
Here’s a breakdown of where to stay in Torres del Paine:
1. Refugios (Mountain Hostels) & Campsites
Refugios are dormitory-style lodges found along the main trekking routes (W and O circuits). They offer a step up from camping, providing a warm bed, shared bathrooms with hot showers, and communal dining areas. They are also social hubs where hikers gather to share stories.
Campsites in Torres del Paine range from basic free (CONAF, often closed or with limited services) to serviced campsites operated by the same companies as the refugios.
Key Refugios on the W Trek:
- Refugio Central / Torre Norte: Near the Las Torres trailhead (eastern end). Operated by Fantastico Sur (now Las Torres Patagonia).
- Refugio Chileno: Partway up the trail to the Torres Base, offering a shorter hike to the sunrise viewpoint. Operated by Fantastico Sur (Las Torres Patagonia).
- Refugio Los Cuernos: Located between the French Valley and the Towers, often featuring cozy cabins as well. Operated by Fantastico Sur (Las Torres Patagonia).
- Refugio Francés (Domos Francés): Dome-shaped units in the French Valley, some offering bunk beds. Operated by Fantastico Sur (Las Torres Patagonia).
- Refugio Paine Grande: Major hub at the western end of the W Trek, accessible by catamaran. Operated by Vertice Patagonia.
- Refugio Grey: Located near Glacier Grey (westernmost point of the W Trek). Operated by Vertice Patagonia.
Booking: Refugios are operated by two main companies:
- Las Torres Patagonia (formerly Fantastico Sur): Operates Central, Chileno, Cuernos, Francés.
- Vertice Patagonia: Operates Paine Grande, Grey, Dickson (on the O circuit).
- book directly with these companies, ensuring your dates align with your trek plan.
- There are travel agencies that offer bookings/tours for W Trek. You do not need to use travel tours. Some may offer convenient booking service for extra service fees.
- Reservations in Torres del Paine National Park | Torres Hike – you can plug in your travels dates and if you want East to West or West to East and this will show all the available options, very useful for planning purpose.
2. Hotels & Luxury Lodges (Inside/Immediately Bordering the Park)
For those seeking comfort and luxury, there are several high-end hotels and lodges located within or immediately outside the park boundaries. These offer private rooms, gourmet dining, spa facilities, and often guided excursions.
3. Puerto Natales (The Gateway Town)
Puerto Natales is the closest major town to Torres del Paine and serves as the primary gateway for almost all visitors. It’s about a 1.5 to 2-hour drive from the park’s main entrances.
4. Lodges and Estancias Just Outside the Park Boundaries
Several high-end lodges, boutique hotels, and traditional estancias (ranches) are located just outside the park’s perimeter, particularly near the Serrano entrance on the southern side, or the Laguna Amarga entrance on the eastern side.
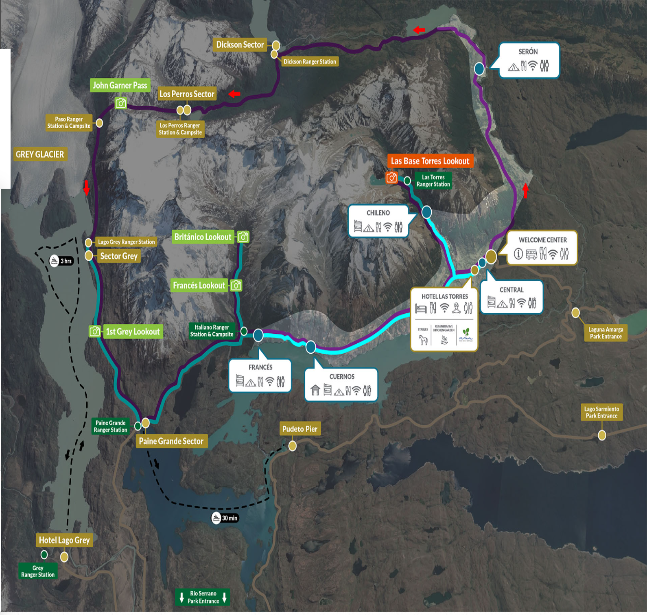
Transportation (Bus/Ferry)
Within Torres del Paine National Park, transportation options are somewhat limited, but generally efficient for accessing key areas. Here’s a summary:
- Catamaran across Lago Pehoé: This is essential for accessing the western side of the W Trek (Paine Grande). The catamaran connects Pudeto (where the buses from Puerto Natales arrive) to Paine Grande. It’s operated by a private company, and booking in advance is highly recommended, especially during peak season. Catamaran Pehoe Reservations
- Boats on Lago Grey: If you’re visiting the Glacier Grey area, boat trips on Lago Grey offer close-up views of the glacier. These depart from near Hotel Lago Grey. Lago Grey Navigation Schedule
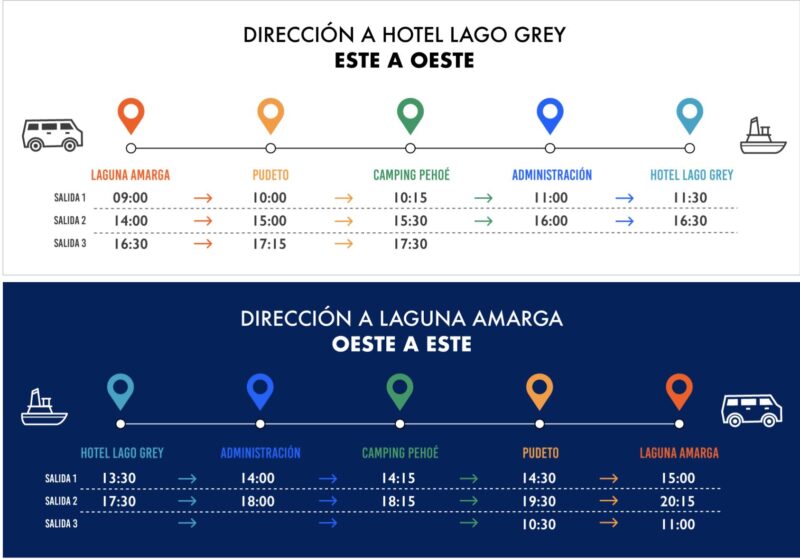
- Bus between Laguna Amarga and Hotel Las Torres/Welcome Center: Bus Sur are now offering transfers between the different bus stops in Torres del Paine (see schedule here). This means you could get a bus from Laguna Amarga to the Pudeto catamaran ferry dock (where you cross to begin the hike to Glacier Grey) or from Camping Pehoe (a cheap campground) to Hotel Lago Grey (where there is a boat across Lago Grey to Campamento Grey for ice trekking or kayaking), or other combinations if you needed to. Torres del Paine – Bus-Sur. For reference/as example, below was the 2024-2025 bus schedule from Bus-Sur. Check Bus-Sur for most up to date schedule.
Border crossing between Chile/Argentina
Driving a rental car across the border between Chile and Argentina (or vice-versa) is a popular option for exploring Patagonia, but it requires specific documentation and planning. This isn’t a “show up and go” situation; you need to arrange the necessary paperwork well in advance with your rental company. We saw a family being turned around at the Chile border and denied them exit due to lack of border crossing permit from the rental company.
Here’s a breakdown of the additional documents and requirements you’ll typically need:
- Special Cross-Border Permit/Authorization from the Rental Company:
- This is the most critical document. Your rental car company must issue a specific notarized permit or authorization that grants you permission to take their vehicle across an international border.
- This document essentially acts as a “passport” for the car, proving that you have the owner’s (the rental company’s) consent to remove it from the country of registration.
- Cost: There will be an additional fee for this permit, which can range from $100-$400+ USD, depending on the rental company, the duration of your rental, and whether you’re crossing multiple times. Some companies structure it based on the number of days you’ll be outside the country of origin or some companies calculate the fee based on the full duration of the rental period.
- Advance Notice: You must inform the rental company of your intention to cross the border when you book the car, or at least several weeks (often 7-14 working days) in advance of your pick-up date. This gives them time to process the notarization and prepare the necessary paperwork. Spontaneous border crossings are generally not possible.
- Company Policy: Not all rental companies allow cross-border travel, or they may have restrictions on which vehicle categories can cross. You need to confirm this explicitly with the rental agency before booking. Major international chains like Avis, Hertz, Europcar, and Budget often have policies for this, but local companies might too.
- What it includes: This permit usually includes details of the vehicle, the renter, and proof of additional liability insurance valid for the destination country (e.g., Argentina, if renting in Chile).
- Mandatory International Insurance (often included in the permit fee):
- You will need third-party liability insurance that is valid in both Chile and Argentina. This is often referred to as a “Green Card” or “Carta Verde” in Mercosur countries.
- The rental company should arrange this as part of the border crossing permit fee. Ensure this is explicitly covered.
- Your Personal Documents:
- Valid Passport: Essential for all travelers. Ensure it has sufficient validity (usually 6 months beyond your intended stay).
- Immigration Slip (PDI): When you enter Chile, you’ll receive a small paper slip (PDI document). You absolutely must keep this safe as it’s required when you exit the country. Losing it can lead to delays and fines.
- Valid Driver’s License: Your national driver’s license from your home country.
- Vehicle Documentation (provided by rental company):
- Rental Agreement: Your official rental contract.
- Vehicle’s Registration/Ownership Papers (Padrón/Padrón Verde): The original vehicle registration document. The rental company will provide this.
- Proof of Insurance (beyond the border permit): Any general insurance documents for the vehicle, as provided by the rental company.
At the Border Crossing:
- Process: Border crossings can be multi-step. You’ll typically stop at the Chilean immigration/customs, get stamped out, then drive a short distance to the Argentine immigration/customs, and get stamped in.
- Present all documents: Be prepared to present your passport, PDI slip (when leaving Chile), your driver’s license, the rental agreement, and especially the special border crossing permit for the vehicle to border officials on both sides.
- Customs Declarations: Be aware of agricultural restrictions. Chile, in particular, has very strict rules on bringing in fresh produce, meat, and dairy. Declare everything or dispose of prohibited items before crossing to avoid fines.
- Time: Border crossings can take time, especially during peak season or if a bus load of passengers is being processed. Factor in potential delays of an hour or more.
Crucial Advice:
- Communicate Clearly: When booking, clearly state your intention to cross the border and the specific countries you plan to visit.
- Read the Fine Print: Carefully review the rental agreement’s terms and conditions regarding cross-border travel and associated fees.
- Verify Documents at Pickup: When you pick up the car, confirm that all the necessary border crossing documents are present in the vehicle and that you understand where they are. Take photos of all documents as a backup.
- Be Patient: Border crossings can be a test of patience. Remain polite and cooperative with border officials.
Itinerary
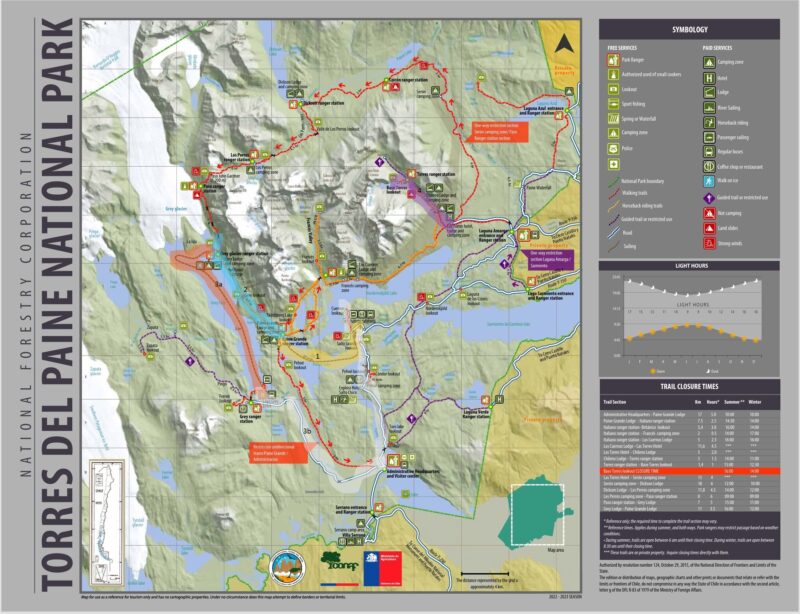
Since we did not do the full W trek, below map highlights the route we took
1 Yellow highlight – Catamaran Ferry to Paine Grande
2 Blue highlight – Hike from Paine Grande to Refugio Grey
3a Pink highlight – Lago Grey Navigation (Glacier tour)
3b white highlight – Bus from Lake Grey back to Catamaran & short hike to Cuernos lookout
4 Purple highlight – Hike to Base Torres Lookout (full day round trip hike)
Day 0: Flight from JFK to SCL
Your adventure kicks off with an evening flight from New York City (JFK) to Santiago (SCL).
Day 1: Arrival in Santiago
Our original plan was to catch the connection flight from SCL to PNT, however, due to flight delay from JFK to SCL, we had to reschedule the connection flight to PNT for the next day, and instead got a day to explore Santiago.
| 9:00am – 11:00am | Arrive in SCL, reschedule LATAM flight to PNT for next day, shuttle to Santiago hotel |
| 11:00am – 12:30pm | Check in to hotel, grocery shopping, lunch |
| 12:30pm – 1:00pm | Uber to the Funicular access to Cerro San Cristobal |
| 1:00pm – 3:00pm | funicular & cable car at Cerro San Cristobal |
| 3:00pm – 5:00pm | walk to Central market, Plaza de Armas de Santiago, Plaza de la Constitucion, La Moneda Cultural Center |
| 5:00 – 7:00pm | Dinner & rest |
Day 2: Journey into Torres del Paine – Paine Grande & French Valley
| 7:00am – 9:00am | shuttle to SCL airport, checkin for flight |
| 9:00am – 1:00pm | flight from SCL to PNT |
| 1:00pm – 3:00pm | Arrive PNT, taxi to Puerto Natales, Pick up rental car |
| 3:00pm – 5:00pm | 2 hour drive to Torres del Paine National Park |
| 5:00pm – 6:00pm | Park at Catamaran parking lot check in / wait for 6pm catamaran to Paine Grande |
| 6:00pm – 6:30pm | Catamaran Ferry to Paine Grande #1 in map yellow highlight |
| 6:30pm – 8:00pm | Check in to Paine Grande and short hike |
| 8:00pm | Dinner & Rest |
Day 3: Glacier Views – Hike to Refuge Grey
Today’s adventure takes you to the magnificent Glacier Grey, an impressive ice formation within the park.
| 7:00am – 8:00am | breakfast |
| 8:00am – 12:00pm | Hike to Refuge Grey #2 in map Blue highlight |
| 12:00pm – 1:00pm | check in & lunch |
| 1:00pm – 5:00pm | Hike to John Gardner Bridge and back – Glacier view |
| 5:00pm | Dinner & Rest |
Day 4: Lake Grey & Condor Lookout
Experience the beauty of Lago Grey by ferry and enjoy a panoramic hike before heading back to your car.
| 8:00am – 8:30am | breakfast |
| 8:30am – 10:30am | Glacier grey lookout |
| 10:30am – 10:45am | Check in for ferry |
| 10:45am – 12:00pm | Lago Grey Navigation #3a in map Pink highlight |
| 12:00pm – 12:30pm | walk to parking lot/bus stop |
| 1:30pm – 2:00pm | Bus-Sur Bus from Lago Grey to Pudeto to where we parked our car #3b in map white highlight |
| 2:00pm – 5:00pm | Mirador Cuernos and Salto Grande hike – 6.5km (4 miles), 2-2.5 hrs return – view of Los Cuernos (horn) |
| 5:00pm | check into Hosteria Pehoe, Dinner & Rest |
Day 5: The Iconic Torres del Paine Base Hike
Today is dedicated to the most famous hike in the park: Mirador Torres del Paine, leading to the base of the iconic granite towers.
| 8:00am – 6:00pm | Full-day hike to Mirador Torres del Paine #4 in map Purple highlight |
Day 6: Torres del Paine Highlights & Drive to El Calafate
Explore more of Torres del Paine’s accessible viewpoints before embarking on a journey across the border to El Calafate, Argentina.
| 8:00am-10:00am | breakfast & enjoy view at Hosteria Pehoe |
| 10:00am – 2:00pm | Drive to El Calafate, Argentina |
| 2:00pm – 3:00pm | check in to hotel |
| 3:00pm – 5:00pm | glacier museum and the ice bar |
| 5:00pm – 7:00pm | El Calafate downtown, shopping, dinner |
Day 7: Perito Moreno Glacier Exploration
Today is dedicated to the awe-inspiring Perito Moreno Glacier, a UNESCO World Heritage site known for its dramatic calving events.
| 8:00am – 9:30am | Drive to Los Glaciares National Park. |
| 9:30am – 2:00pm | Los Glaciares National Park |
| 2:00pm – 3:30pm | Drive to El Calafate |
| 3:30pm – 5:30pm | Reserva Laguna nimez |
| 5:30pm | Dinner & Rest |
Day 8: Return to Puerto Natales & Milodon Cave
Bid farewell to Argentina as you drive back to Puerto Natales, with a stop at the historic Milodon Cave.
| 10:00am – 2:00pm | check out and drive to Puerto Natales |
| 2:00pm – 2:30pm | return rental car |
| afternoon | relax and walk around Puerto Natales |
| 5:00pm | Dinner & Rest |
Day 9: Balmaceda & Serrano Glaciers Navigation
Embark on a memorable boat excursion to the Balmaceda and Serrano Glaciers in Bernardo O’Higgins National Park.
| 7:50am – 8:00am | check in for Glacier Tour |
| Full day | Balmaceda and Serrano Glacier Navigation Tour |
| Evening | Dinner & rest |
Day 10: Return home
Well, it seems our South American adventure had one more surprise in store for us, and it wasn’t exactly a pleasant one! Our travel flight misfortune continues…
A couple of days before our planed return flight, we got an email from LATAM about a refund. We found it a bit odd, thinking it might be related to a previously missed connecting flight. We checked our reservation on the LATAM app and could still see our return flight information, so we sent a quick email to inquire but (our mistake!) didn’t follow up. For the past two days, we kept checking the app, and it showed “automatic check-in in progress” for our return flight, leading us to believe everything was good to go. (Again, we really should have called and asked.)
We were all set for our 2 PM flight from Puerto Natales (PNT) to Santiago (SCL) today. We arrived at the airport only to discover that our return ticket had been completely canceled – and the refund we’d seen was for that very ticket! We never requested a refund, so we suspect a LATAM staff member, who helped us rebook our missed connection the other day, might have made a mistake and canceled our return journey by accident.
At the airport counter, the LATAM agents were sympathetic but couldn’t directly help. They even lent us their cell phone so we could call the LATAM call center from the airport. The agent on the phone was equally unhelpful, stating there was nothing he could do since the ticket was already canceled and refunded. Our only option was to book new return tickets.
To our dismay, there were no more available seats from PNT to SCL until Wednesday. Just when despair started to set in, we remembered Punta Arenas airport, about three hours away by bus. We asked if there were any available flights from there, and thankfully, there were! We managed to snag four seats on an 11 PM flight from Punta Arenas.
This unexpected turn means our journey home will now be a long, two-day odyssey, arriving back at JFK a day later than originally planned. It includes a long stopover in Santiago and another unexpected stop in Lima (always wanted to go to Lima, but definitely not like this!).
Where we stayed
| 1 night Santiago | Hotel Fundador (arranged by LATAM) |
| 4 nights Torres Del Paine | Refugio Paine Grande 1 night Refugio Grey 1 night Hostería pehoe 2 nights |
| 2 nights El Calafate | Cabanas Teuepen |
| 2 nights Punta Natales | Pristine Patagonia Hotel |
| 1 night Santiago | Holiday Inn Santiago – Airport |
No Responses